STEM
For this week's STEM , ask your child to think back on the year, what was their favorite STEM activity? Draw a picture or write about that activity. Send it to me an email.
Parents, thank you for all your help with STEM during e-learning!
Kids keep exploring over the summer!
Kindergarten
Mixing colors
Get three cups and fill each cup with water to be about 1/4 full. In one cup put a drop or two of yellow food coloring, n the next cup put blue, and the last cup put red. Take a paper towel and cut it into 3 strips. Put one end of the paper towel in yellow and blue, another in yellow and red, and the last in red and blue. (See pictures) Watch over the next couple days. Let me know what happens!


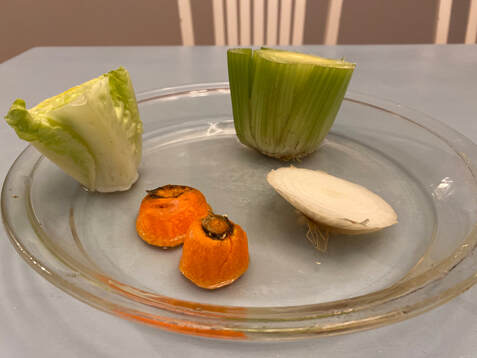
Grow vegetables from scraps
Carrots or Beets
Have a parent cut off the top of a beet or carrot. Put it top up in a shallow tray of water. What do you think will happen?.
Celery or lettuce
Take a head of romaine lettuce or a stalk of celery with roots at the bottom. Have a parent cut off the tops and place the bottoms in a bowl of water and for the next couple days. What do you think will happen?
Onion
Have a parent cut off 1 inch from the root. Place the root in shallow water. What do you think will happen?
Make sure to place your vegetables in the sunlight. What do think will happen? Why? Watch over then next couple days. Let me know what happens!
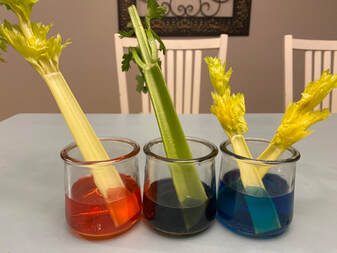
Celery experiment
You'll need:
celery with leaves
cups
water
food coloring
Pour water into the cups. Add a drop of food coloring into each cup. Place a celery stalk into each cup. Make predictions! What do you think will happen? Watch for the next couple days, what happened? Why? I'd love to hear what happened!
You'll need:
celery with leaves
cups
water
food coloring
Pour water into the cups. Add a drop of food coloring into each cup. Place a celery stalk into each cup. Make predictions! What do you think will happen? Watch for the next couple days, what happened? Why? I'd love to hear what happened!
First Grade
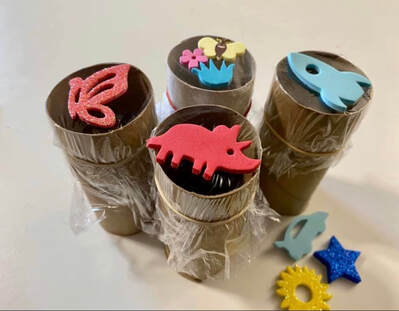
Make a shadow
Materials that you'll need:
Cardboard roll
saran wrap
foam stickers or paper shapes
rubber band
flashlight
Wrap a piece of saran wrap over the top of a cardboard roll. Put a rubber band over the wrap to keep it in place. Stick a shape on top. Find a blank wall and turn off the lights. Place the flashlight inside the tube and shine it towards the wall. What do you see? Let me know what kind of shadow you made!
Watch your shadow
Materials that you'll need:
Pencil
Paper
Chalk
On a sunny day go outside around 9:00. Find a spot like your driveway or sidewalk. Look for your shadow. Once you find it, have a family member trace it. Mark an x on the ground where you were standing, so you will know where to stand later in the day. On your paper write down what you think your shadow will look like later in the day. At round 12:00 go stand it the same spot and see if you shadow is the same. Write down what you see. Then, head back out around 4:00 to see what your shadow looks like then. Write down your observations again. What happened to you shadow during the day? Why do you think this happened? Let me know what you learned.
Second Grade
Second Grade
Make a shadow
Materials that you'll need:
Cardboard roll
saran wrap
foam stickers or paper shapes
rubber band
flashlight
Wrap a piece of saran wrap over the top of a cardboard roll. Put a rubber band over the wrap to keep it in place. Stick a shape on top. Find a blank wall and turn off the lights. Place the flashlight inside the tube and shine it towards the wall. What do you see? Let me know what kind of shadow you made!
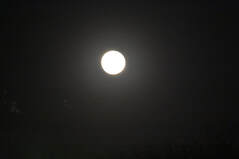
Moon rover
For the past couple weeks you've been observing and learning about the moon. Your challenge now is to take what you learned about the moon and make a moon rover. A moon rover is a vehicle that scientists use to study the moon. Think about the moon's surface, what kind of vehicle would they need to move over the moon's surface? What does this vehicle need to keep the equipment on it protected and safe? After answering these questions, design a moon rover. Use any supplies that you may have. Legos, blocks, or items from your recycling bin are just a few example of items that could be used. You could test your rovers by driving them over rocks. I'd love to see your moon rovers!
Listen to the story Max Goes to the Moon. Write down couple facts that you learned about the moon. Email me, telling me what you've learned about the moon.
https://storytimefromspace.com/stories/max-goes-to-the-moon/
Materials that you'll need:
Cardboard roll
saran wrap
foam stickers or paper shapes
rubber band
flashlight
Wrap a piece of saran wrap over the top of a cardboard roll. Put a rubber band over the wrap to keep it in place. Stick a shape on top. Find a blank wall and turn off the lights. Place the flashlight inside the tube and shine it towards the wall. What do you see? Let me know what kind of shadow you made!
Moon rover
For the past couple weeks you've been observing and learning about the moon. Your challenge now is to take what you learned about the moon and make a moon rover. A moon rover is a vehicle that scientists use to study the moon. Think about the moon's surface, what kind of vehicle would they need to move over the moon's surface? What does this vehicle need to keep the equipment on it protected and safe? After answering these questions, design a moon rover. Use any supplies that you may have. Legos, blocks, or items from your recycling bin are just a few example of items that could be used. You could test your rovers by driving them over rocks. I'd love to see your moon rovers!
Listen to the story Max Goes to the Moon. Write down couple facts that you learned about the moon. Email me, telling me what you've learned about the moon.
https://storytimefromspace.com/stories/max-goes-to-the-moon/
Last week's second grade STEM (Just incase you did'n't get a chance)
We’ve been learning about states of matter; liquid, solid, and gas. We’ve done several experiments changing the states of matter. Here are a couple more activities to choose from to extend our lesson. I'd love to see your STEM projects, so feel free to send an email showing me what you've done!
*Make a recipe- With an adult follow a recipe to make something to eat; pancakes, cookies, jello, rice crispy treats, pudding, whatever works. Help with measuring, pouring, and mixing. Notice the different liquids and solids used to make the food. After you’re done write down the different solids and liquids that you used. Describe the final product. Is it a liquid or solid?
*Make chalk paint- In a bowl, mix a 1/2 cup of water and a 1/2 cup of corn starch. Add a couple drops of food coloring. It may be tricky to mix at first, like the oobleck, but it will become a liquid. Once it’s mixed, grab a paint brush and head outside to paint the sidewalk!
Third Grade
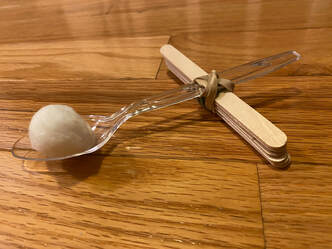
Basketball catapult-
Supplies:
popsicle sticks
rubberbands
a plastic spoon
a cotton ball or pompom
plastic cup or bowl
Challenge- Using the supplies try to make a catapult that would launch the cotton ball into the cup. Good luck! I would love to see your catapults!
Position Game- Do the position activity found on page 433 in your science book. If you don't have your book at home, I've written out the directions. You will need Legos or blocks, a folder, and a partner to play with. You and your partner will need the same supplies. You will build something with your blocks without your partner seeing it. With the folder in between the two of you, describe to your partner how to build your creation. You'll have to describe your pieces that you are using to your partner. Use position words like; on top of, below, next to, to the right, to the left, in front of, behind, so your partner can make the same creation. Think about how to best describe it to your partner. It's tricky! After you've finished describing your creation, check to see how your partner did!
These are some pictures of the games that my daughter and I played. Hopefully it will give you a visual of how the game is played.


Picture 1. Our pieces all lined up ready to go. The folder is in the middle so we can't see each other's.
Picture 2. My first creation. My daughter followed my directions perfectly!
Picture 3. My daughter's creation. If you look carefully, you'll see that I made a small mistake.
Let me know how your games go! What challenges did you come across during the game?
You can continue to work on your animal adaptation project. Send pictures so I can see what you've been doing!
We’ve been talking about adaptations. We started an animal project, where each student created an animal to survive a particular habitat. Each student filled out the attached worksheet which is at school. I’m attaching the paper so the kids can reference it but they do not need to fill it out again.
*Adaptation Project- On a solid piece of paper draw your animal. Use crayons, colored pencils, markers, to show traits. On a separate lined piece of paper describe your animal. Tell about it’s different traits and why it has those traits. Remember it needs to have traits that will allow it to live in it’s habitat. Use the work sheet of questions as a guide. Send pictures of completed animals. I'd love to see what you've come up with!
The 5 habitats to choose from; Desert, Temperate Forest, Tropical Rain Forest, Ocean, Wetlands
Adaptation worksheet
Pick a habitat that you learned about ___________________
Explain how your animal’s adaptations will allow it to survive it’s habitat.
1. What will it eat for food? _________________________
Mouth_________________________________________
Teeth__________________________________________
Other__________________________________________
2. How will it move? _______________________________
Arms__________________________________________
Legs___________________________________________
Wings__________________________________________
Fins____________________________________________
3. How will it avoid predators?_________________________
4. How will it survive the temperature? __________________
Draw your animal:
